Pages

Showing posts with label 18th c Stays. Show all posts

Saturday, June 25, 2011

Red Rover, Red Rover, Bring Your Stays over....

So I am ALMOST done the stays for Mrs. S.  They are made from 3 layers, 2 cotton canvas and 1 is a rough textured red silk.  The binding is a faux suede that I had  purchased at a fabric store in Vancouver BC many years ago.  I bought it because it was literally identical to real suede but much easier to sew through.  The channels are machine sewn as I don't have the patience or the ambition to do it by hand.  I'm not that hard core!  LOL.  I used German  Plastic Whalebone, cutting and sanding each end so that it had less of a chance to poke through the fabric.  I also used metal grommets which I'll cover in thread to make them look period.  I just have to finish up the binding and put in a lining. 

Now that is one gorgeous figure! 


The bowed shaped front of the 1780's


Monday, April 4, 2011

Busy Busy Busy....

Honestly I'm still here!  I've been super busy during the past few weeks.  First the hubby was home, and then he left and we all got sick.  I finally feel back to normal after 7 days and I have been busy.  I draped and draped and draped the Poiret coat, did a mock up of a new corset pattern, and have been working away at Sam's 1780's stays.  I almost have one half of them done.  I just finished binding around the tabs with some faux suede I found years ago.


This was a quick shot while I was back in the sewing room cutting out more binding.  I found a wonderful tutorial on binding the edges of stays Here done by Cathy Hay from Your Wardrobe Unlock'd.  Its gotta be the best tutorial I've seen.  I've also found that binding the tabs without the boning in the channels makes the job a little bit easier as you can bend the stays around and crumple them with your hands as you work.

Monday, January 24, 2011

THe nightmare is over!

WOW!  Its all I can say...the Zone front Polonaise from hell is finished.  I'm starting to like it.  I think! LOL. 

I have been so lax in updating the progress of the dress so I probably will do a few different posts.  I don't want to make this one to long.

So I perused my last entries to see where I had left off on chronicling the polonaise....I have been very bad!  lol.  Well I ended up getting the Peach petticoat finished and spent hours upon hours on hand sewing running stitches and gathering and tacking the 10 meters of ruffle that went on the bottom of it.  I also pinked both the top and the bottom edge of the ruffle.  I think in hindsight I will be trimming off the "hairs" that have developed on it and using some Fray check, just so that the edges can stay nice and fresh.  I added the ruffle because the petticoat was about 3 inches too short, for my tastes anyways.   I know I could have gotten away with the hem being short as most of the fashion plates and extant garments I've found show the gowns to be ankle length, but I wanted to be able to hide my shoes since I have nothing that remotely comes close to the typical Louis style.

I had to make a new bum roll as the one I currently have is for a Victorian bustle and wouldn't work.  I went with a petal shape as I wanted the back of the skirt to be supported when I gathered it.  I thinks its pretty cute!
I had so many problems with this dress and I was frustrated with myself both in my draping and fitting.  Although in my defense one can only do so much with a mannequin and pin to oneself is a bit tricky.  I tried the gown on when I was almost finished, all I head left to do was finish taking the rest of the trim on the zone.   TO my dismay I had almost no movement in the sleeve.  It was too tight across the bicep and pulled when I tried to move.  I also forgot to add any kind of seam allowance to the neckline and the result was it was to wide and showed the straps of my stays and part of my chemise underneath.  The whole top felt very uncomfortable.  I had just enough fabric to re cut the sleeves, but only after I altered a pattern for a modern sleeve into the shape of a 18th c type sleeve.  After I had done about 6 or 7 new sleeve mock ups and finished tweaking as much as I could I re cut the new ones and sewed them in place.  I also realized that I had cut the armhole to low on the bodice which contributed to the pulling on the bicep and limited range of motion.

Before I did the sleeve however I cut apart the top of the bodice and made new straps to widen the shoulders so it didn't fall off the shoulder.  I wish I had stopped and taken pictures of it, but I was frustrated and annoyed I just wanted to get it done! 


So then I finally get the sleeves done, the rest of the trim attached and I try in on for the final fit.....AND  IT DOESN"T!!!!!!!

Oh my F"N GAWD!!!!!

I took it off, threw it on the floor and kicked the bathroom door a few times....okay...ALOT!  I'm happy to report the door is solid and still in one piece.  I have to be honest I contemplated cutting up the dress into a thousand different pieces.  Yes I was THAT insane with frustration and anger.  After I calmed down I looked at the best way to fix the dress...AGAIN!  I ended up taking it in in the center front.  It was the easiest way.  While I was taking it in I also decided to put in a piece of boning to keep the front straight so it wouldn't wrinkle.  I hate sewing hook and eyes so I found a piece of hook and eye tape and used that and hand sewed eyes instead of the eyelets I did before.  The eyes worked so much better.

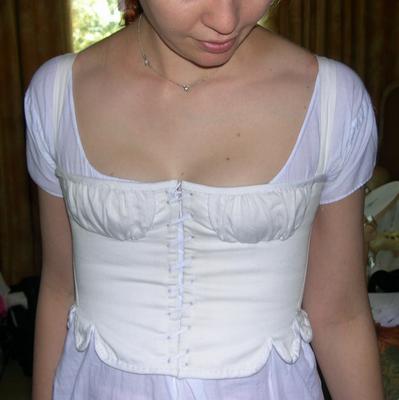
The stays also had a transformation.  I cut the straps off and ended up sewing pieces of fabric in between the tabs.  I found that when I was wearing them it was digging in where the tabs opened up.   I also noticed that when they settled into place at my waist they were too short.  more of an under bust version rather than over bust.  I also had to take them in so they were tighter, since I had lost weight since I first started making them.  I most likely won't finish this set of stays.  They were a mock up to begin with so I know the changes I'll have to make to the "good" pair.

When I finally got to put on the gown an all of the accouterments I left out the chemise.  I don't like the way it fits...I plan on reworking the pattern into something that's not so voluminous.

In the end I finally got a gown that can be worn....Which I did to my first 18th c event.  More on that with some nice pics of myself and the hubby all decked out....

Stay tuned!

P.S....I forgot to mention that during this horridness of constructing, deconstructing, constructing...my wonderful boys decided to have a chocolate pudding war (my sewing room is the dining room since it's the only room in the house with a table) and slopped it all over the dress.   I managed to get out the chocolate, but boy was I mad....

Wednesday, December 15, 2010

Here come the Polonaise!


So for the better part of the day I have been draping my Zone front Polonaise.  Its coming along perfectly.  I do have concerns about draping sleeves tho, you know it's one thing I have never done! I didn't have a pattern so I did what I usually do when I don't have a pattern, I drape it on  Mrs. Swishypants, (name courtesy of AShton), my mannequin.  Here are pictures of the almost finished set of stays and the draping the bodice or the polonaise.
Front with half of the stays bound with faux suede binding.
 
The sketch of  the 1780's Polonaise

The back with en Fourreau pleats.

Close Up of marking the side seam for the front


Front Side Seam pinned

Front, you can see the shape of the zone. 

Friday, December 3, 2010

Transitional Stays....10, Katy and the Girls.....0!

SO yesterday I hopped onto an idea to make transitional stays into regular everyday wear.   WOW what a challenge!  Sorry I don't have much for photos...I just got too excited about doing them.  I started trying to do the ones with the gathered ups.  They should end up looking like this....
http://www.koshka-the-cat.com/1790s_stays.html

 Unfortunately, the GIRLS are WAY to big for this method and I ended up having a square boob.  I know what you are thinking...how do you end up with a square boob...it happens even though I tried different shapes and sizes I still could not get the fit properly for the girls.

Let me point out that the base, (the area that goes around the body), fit perfectly, so I have been fighting with fitting the cups for hours at this point.

The next shape I tried was this.....
http://romantichistoryclothing.blogspot.com/2009/10/1820s-1830s-corded-stays.html


With the bust gussets, (the triangular shaped thingys in the chest area).  This shape worked out a bit better, but still flatted the girls into pancakes.  I did however like the way the under boob looked in it, just not the shelf look.  If that makes sense.

So I was left with a conundrum, I could stay with period style or I could deviate and do a more modern cup.  I have opted for a more modern cup and so far so good.  Right now I'm just trying to play on size so that the girls have enough room to fit.  THe other problem I'm faced with is the center front between the girls.  It bows out, when it should separate and help lift the girls.  I think the solution to the problem is having the busk in there, (a long wide wood or metal or plastic piece), I'll try that on another muslin to see how it works.  I also need to see how I am gonna close it.  Is it gonna lace in the back, in the front, the sides.  How is it gonna wear and how easy will it be t o get into it? 

I should also point out that the pattern for this has been draped on my mannequin.  I love draping because you get to see the effect on the body of how the fabric shapes to it.  Maybe one day I'll do a tutorial.  I much prefer draping to drafting.  I just can visualize the shapes on paper and seem to do a great deal of altering in order to get what you want.  at least with draping you have almost a finished pattern to start with.    I also learned that cotton organdy is THE BEST for doing muslins and draping patterns for garments that need stability.  It is very stable, although somewhat expensive, at about 10 bucks a meter.  But I would rather sacrifice cost for working with wobbly fabric.

Wednesday, December 1, 2010

Still sewing away.

I haven't abandoned you guys....I'm still here.  Slowly the stays are coming together, I've been doing alot of zippers lately and finally have them all done and no more are supposed to come in for about a week.  So I should have plenty of time to hand sew all the eyelets.  K well maybe not ALL the eyelets.  I'm sorta getting impatient to finish it so I can see if the pattern was a gooder, (yes it's a word, and no you can't find it in the dictionary).  I plan on doing the bare minimum on eyelets so that I can try it on, then I'll finish them.  So if you don't hear from me for a while you know what I'm doing.

Cheers!

Friday, November 26, 2010

Eyelets, eyelets and more eyelets.

Alas, dear readers I have been remiss in doing much sewing on my stays.  I have however started the hand bound eyelets and a few problems have popped up.  One, I forgot I was gonna line the stays before I started the eyelets, (really how could I forget, DOH moment), and 2 Well I guess it was only one problem BUT in my defense it felt like a BIG one!  LOL! only 40 or so left to do.
Front side

Back side....a little bit messy but that's unavoidable.
I also acquired some beautiful light weight linen from a new friend of mine....Lets call her "The Partner in Crime", PIC for short.  She had it in a huge stash of fabric which I was drooling over.  I plan on making it into a chemise for under the stays.  I also found a pretty cotton lace that I will use to edge the neckline and the sleeve hems.  I think it can pass for a needle lace. 
Linen

Sunday, November 21, 2010

18th c Stays

So I've done lots and lots of research into the making of a set of 18th c stays and although the concept of them seems really easy, the execution is not.  I'm on the 4th set and getting frustrated.  I'm frustrated cuz I can make a modern day corset that fits the body beautifully, but am having difficulty achieving the silhouette of the 18th c.  Hopefully with a completely new pattern and new boning it should work out. 

I can't show you the beginning of the 1st and 2nd set of stays since I started making them about 6 months ago and have since gotten rid of them.  They were mock ups anyways just to see about fit.  I finally thought that after the 2nd mock up that I had the fit right.  I was getting so frustrated and then DH pointed out a small detail as to why i was getting a cylindrical shape instead of the conical shape I wanted.  So I altered the pattern to his suggestions.  Sometimes someone who has very little knowledge of sewing, but a very analytical mind can see the flaws you don't, which is why I ask him for he;p sometimes.  :D  I was so excited!  I had found a solution and as soon as we were somewhat settled in in NS I dug out my pattern and fabric and got to work.

Unfortunately the excitement was short lived and when I put on my almost finished stays, they still gave me a cylindrical shape.  AAAAAAAARRRRRGGGGGGGGGGHHHHHHHHHH!  So irritated that all that time was spent on sewing a completely useless set of stays I thought I would start fresh.

These are the 3rd pair and as you can see the shape it would create is the wrong one.

So I started searching again and came across Fushia's 18th c Dress Project blog and she had a link to a free stays pattern through Ralph Pink's Site, which the link didn't work for here or me so she had another link http://www.fashion-gorgeois.com/pattern-cutting/corsets Which takes you back to the Ralph Pink site but somehow works.  Just download the file and there yah go.  5 free patterns.

So since I had no printer to print out the pattern I did however have stabilizer for embroidery which can be used as a sort of tracing paper.  So I enlarged the pattern in Adobe on the computer and traced it.  Genius I know!  lol.


This pattern is considerably different that the one I drafted.  I thought I was somehow cheating by using a pattern I hadn't drafted, but I can see where I went wrong in my previous attempts.  Besides It doesn't matter how you got there as long as you achieve your goal in the end, (with in reason)  lol.  So I swallowed my conscience and continued.


 And this is the result so far....I ran outta boning so I am waiting for new stuff to arrive.  Hopefully *fingers crossed, this new set will fit.

And I can get on with the fun stuff of making the polonaise.  Although I still have a new bumroll, a chemise, and a couple of petticoats to make first.  After all you can't have a proper fitting garment unless you have the foundation first.

Just a Note:  I admire the other wonderful women who have made 18th c clothing and have the determination to do it all or mostly by hand. I however am impatient and am not a big fan of hand sewing, so I will endeavor to sew as much of the dress by machine as I can...Just saying.  ;)  lol