Pages

Showing posts with label FAbric. Show all posts

Thursday, August 4, 2011

Green With Envy....

Well maybe not envy, but I was definitely seeing green as I was making my current gown.  I finished it weeks ago and have since worn it to two events....but I just realized I haven't shown you.  

I ordered 5 yards of this wonderful 5.3 oz green linen from http://www.fabric-store.com/, and it was super awesome to work with....It softened up and washed beautifully in the washing machine.  I draped the pattern on Mrs. Squishypants, and decided to go with the "a l'anglais" style back, as it was new and I had never done it before.  I am getting better at sleeves too, The muslin worked awesome with three little pleats at the sleeve head, but as I was fitting the actual sleeves I had to combine the three into two and fiddle with them a bit....Still at least it wasn't hours of remakes and fiddling!

I used hooks and thread eyes for the front closure and they work but I am not too happy with the result....if I'm not laced tight enough, they pull and you can see them.  To me it ruins the clean lines of the front of the dress, but since I haven't mastered the "pinning of oneself" into a gown yet, it will have to do. 


Friday, June 24, 2011

Raspberries Anyone?!?!

So I've also been working on two bridesmaids dresses for my sister in law Miss Maggie for her upcoming wedding in August.  They aren't completely finished yet, just needing the zipper, a hem, and the skirt part of the lining. 

The fabric is silk dupioni from http://www.silkbaron.com/  I absolutely love his silks.  They are such a nice quality and weight for a fabulous price.  He has great lead time in shipping and fanatastic customer service.   I probably sound like a walking billboard, but I just can't rave about his stuff enough.

Here is one of them....Stay tuned for dress # 2


Sunday, March 6, 2011

Capes Are NOT Just For Batman.

I am in LOVE.

It took me a few dates, But I am In love!

With Frenchy's.  Its a ubercool Thrift store, that is actually selective as to what gets put in the bins.  My last visit I found a DNKY jacket.

DONNA KAREN!  With this sage green lining and cream and brown herringbone wool.  unfortunately it was too big on my and I had to put it back.  Sad face!


Why is this Uberexciting to me?  Well because I've always thought about using my fashion design background and creating something sustainable.  Don't get me wrong I LOVE LOVE LOVE yards and yards of fabric, with its clean untouched surface waiting for me to make it into something exotic and beautiful, but for the past 5 years have lived in places that are the black hole of fabric lovers.  I've had to become creative and think outside the box in order to find my fabrics.  I've always admired the designers who take already made garments and turn them into something fun and unique, but in order to do that one has to have a readily available supply of second hand garments.  Which until now has been next to impossible.

Now I have Frenchy's!

I've since learned (and this was a major DUH moment) that sheets work fabulous for muslins and at 2 bucks a pop, thats ALOT of fabric. 

On my recent trip I found a 100% worsted wool charcoal grey pleated skirt.  It was calf length and  gathered into a waist band in the back and huge box pleats in the front.  LOTS of fabric.  I have been thinking that when I create my Reenacting clothing that I don't really put a whole lot of thought into the accessories and one of those accessories I over look is the cape.  I thought this skirt would be perfect for a cape! 

BUT it couldn't be just a plain old boring cape, I had to make it fun. And modern.  So I could wear it all the time.

I decided I was gonna base the look off of my friends cape at Sewaholic, her's is from a groovy 60's vintage pattern.  I wanted the seams to go down over the bust and have an opening for my arms to come out of.  In the back I wanted it pleated like a Watteau Gown from the 18th century.  The best of both worlds.  Something I could wear with my historic clothing and my modern stuff.

Back with the pleats.  Its inside out.

Front, inside out

The shoulder, inside out.  I had already sewn the shoulder seam but it didn't lay properly so I had to take it out and baste it in so it layed better .  You can see the back had to come up quite a bit.
I draped the skirt on Mrs. Squishypants and formed the pattern.  The back of the skirt became the front of the cape, and the front of the skirt became the back. 

Needs a final press.

I love how the pleats face towards the CB, creating a fan with the folds.

The funnest thing about this cape!  The bias bound seam allowances in a funky ink and yellow flower patterned cotton.

I opted for a mandarin collar and I bias bound the seam allowances in a fun pink and yellow cotton that used to be a girls sundress in it's previous life.  I hand sewed bar tacks at the top of each pleat and the opening in the princess seams for the hands.  I also did a spaced back stitch along the center front and the collar to hold it in place.  The hem was a herringbone hem stitch.  It will be closed with hook and hand sewn eyes for now until I find a wonderful cloak clasp. 

I love the finishing details.
It just MAKES the cape.

Sunday, February 13, 2011

Creating the Casaquin

Well I made the necessary adjustments to the pattern, created the lining pattern pieces and and currently cutting out the interlining from a cotton sheet.  I chose to interline the silk as it it very delicate and since there was the possibility of stress on the seams I wanted extra reinforcement for the silk.  I also wanted to give the silk more structure and body as the lining is going to be linen, which is normally has a soft drape

Hopefully next time I will have pictures of the jacket being constructed.

Cheers!

Thursday, December 23, 2010

Work work work....

For the past week I have been working on my Polonaise faithfully every day and I am pleased to show you the progress.  There are a lot of changes I plan to make on the next English gown I make, but for now I have  a  few pictures for your viewing pleasure.  I am trying to get it done for a levy on New Years Day....Here's keeping my fingers crossed.  I do have doubts tho...I am having troubles figuring out what kind of trim to use...should I self trim it, do I do gathers or pleats?  rosettes?  hmmmm...Ideas ladies?


I have also gotten a lot farther on it, but have been so busy with it I haven't taken much for pictures.  I have also done a petal shaped Bum Roll....the kids laugh cuz it makes my butt huge and anything to do with big butts makes them laugh!  BOYS!

Friday, December 3, 2010

Transitional Stays....10, Katy and the Girls.....0!

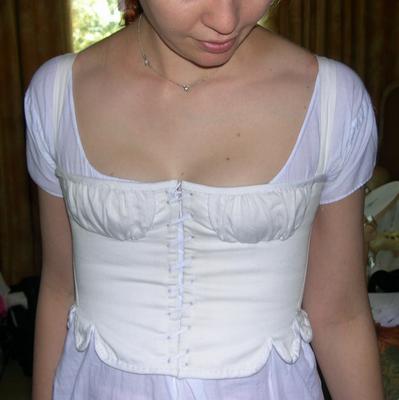
SO yesterday I hopped onto an idea to make transitional stays into regular everyday wear.   WOW what a challenge!  Sorry I don't have much for photos...I just got too excited about doing them.  I started trying to do the ones with the gathered ups.  They should end up looking like this....
http://www.koshka-the-cat.com/1790s_stays.html

 Unfortunately, the GIRLS are WAY to big for this method and I ended up having a square boob.  I know what you are thinking...how do you end up with a square boob...it happens even though I tried different shapes and sizes I still could not get the fit properly for the girls.

Let me point out that the base, (the area that goes around the body), fit perfectly, so I have been fighting with fitting the cups for hours at this point.

The next shape I tried was this.....
http://romantichistoryclothing.blogspot.com/2009/10/1820s-1830s-corded-stays.html


With the bust gussets, (the triangular shaped thingys in the chest area).  This shape worked out a bit better, but still flatted the girls into pancakes.  I did however like the way the under boob looked in it, just not the shelf look.  If that makes sense.

So I was left with a conundrum, I could stay with period style or I could deviate and do a more modern cup.  I have opted for a more modern cup and so far so good.  Right now I'm just trying to play on size so that the girls have enough room to fit.  THe other problem I'm faced with is the center front between the girls.  It bows out, when it should separate and help lift the girls.  I think the solution to the problem is having the busk in there, (a long wide wood or metal or plastic piece), I'll try that on another muslin to see how it works.  I also need to see how I am gonna close it.  Is it gonna lace in the back, in the front, the sides.  How is it gonna wear and how easy will it be t o get into it? 

I should also point out that the pattern for this has been draped on my mannequin.  I love draping because you get to see the effect on the body of how the fabric shapes to it.  Maybe one day I'll do a tutorial.  I much prefer draping to drafting.  I just can visualize the shapes on paper and seem to do a great deal of altering in order to get what you want.  at least with draping you have almost a finished pattern to start with.    I also learned that cotton organdy is THE BEST for doing muslins and draping patterns for garments that need stability.  It is very stable, although somewhat expensive, at about 10 bucks a meter.  But I would rather sacrifice cost for working with wobbly fabric.

Sunday, November 28, 2010

Road Trip!

I had a road trip this weekend...I did, I did! 

Unfortunately it wasn't a fun road trip.  It meant that I had to drop off my oh so fabulous husband at the airport so he could go back to his not so fabulous job in the frozen arctic tundra.  BLECH!!!    I miss him already and it's only been a few days.  On the plus side, I...got to visit....wait for it.....AN HONEST TO GOODNESS REAL LIFE FABRIC STORE!!!!

OMG I KNOW!!!!


LOL.  It was beautiful!  I nearly had a tear in my eye.  After 5 long years of living so far away from a fabric store I have one relatively close by.  I was in heaven.  I only wish I could have enjoyed it for much much longer.  Alas I could not.  We, and I mean 4 very small boys, had just traveled 3 hours to the city, so they had pent up energy and were going CRAZY!  This is not exactly the ideal way to visit a fabric store.  I managed to quickly get a couple of zippers for alterations (another BLECH), a package of pins, and a meter and a half of batiste cotton.  While my kids complained about how boring it was and layed about and wiggled on the floor or screamed from my arms. 

I'm planning on going back...in the near future...without the monsters.  Being in that store was such a horrible tease.  I need to spend hours drooling over the fabulous fabrics.  I just hope I'm not disappointed.  I'm finding lately that my expectations have gone through the roof and am finding it hard to be completely satisfied...

"what do you mean you don't have linen?"

"oh its a summer fabric so we put it away in the winter"

What about those people who want to purchase linen in the winter...like me for example.  Hmmmmmm.

Friday, November 26, 2010

Eyelets, eyelets and more eyelets.

Alas, dear readers I have been remiss in doing much sewing on my stays.  I have however started the hand bound eyelets and a few problems have popped up.  One, I forgot I was gonna line the stays before I started the eyelets, (really how could I forget, DOH moment), and 2 Well I guess it was only one problem BUT in my defense it felt like a BIG one!  LOL! only 40 or so left to do.
Front side

Back side....a little bit messy but that's unavoidable.
I also acquired some beautiful light weight linen from a new friend of mine....Lets call her "The Partner in Crime", PIC for short.  She had it in a huge stash of fabric which I was drooling over.  I plan on making it into a chemise for under the stays.  I also found a pretty cotton lace that I will use to edge the neckline and the sleeve hems.  I think it can pass for a needle lace. 
Linen